
 Shop Store
Author Archives: Nadine Reynolds
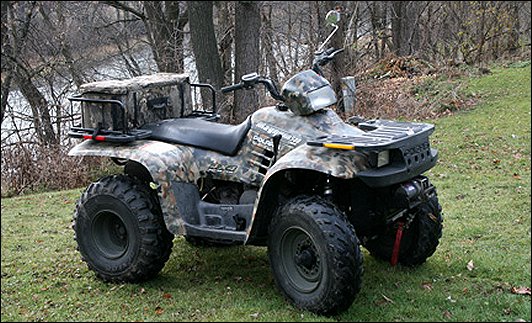
Whether you’re just getting your ATV out for the season or looking to spruce it up for a few final runs before the weather gets cold, a good tune-up will greatly enhance its performance while reducing your chances of getting stranded on the trail. With these eight tips from The Motor Bookstore, you’ll have your ATV in prime running condition in a matter of minutes.
Four Wheeling: ATV Tune-Up Tips
- Check the tire pressure, and if it’s low, fill to the recommended levels in your factory or repair manual. Also double-check that the lug-nuts are tight, and see if your tires have any damage or excessive wear.
- Check the oil, and change if it looks black and gummy. Make sure all oil, coolant and gasoline levels are topped off.
- Change any frayed or broken ignition wires. If the cord is hanging underneath, go ahead and change it now. You don’t want it to break when you’re 30 miles from civilization.
- Make sure the throttle and brake cables are snug, undamaged and don’t catch when you twist the handlebars. If a cable is binding up, find the problem and either fix or replace the offending part. It’s better than having a stuck throttle when you’re headed for a tree.
- Take out the spark plugs and examine them; replace any that are dirty or worn, gapping them to manufacturer specifications. Don’t bother trying to clean dirty spark plugs – it’s not as reliable as new clean plugs, and isn’t worth the time required.
- Check the gas filter (on the gas line) and the air filter (on top of the carburetor), and replace them if they look clogged or broken.
- If you have a chain drive ATV, make sure the chain is properly lubricated. If it’s looking dry, treat it with chain lube or WD40. Those with belt drive ATVs should make sure the belt hasn’t slipped or cracked.
- Give the frame a once-over for any damage or wear. If it checks out, you’ll officially be ready to head out on the trail.
Have a motorcycle that needs tuning as well? Check out our blog on Spring Motorcycle Preparation.
If you need to add refrigerant to your air conditioning system, it’s a good idea to add or replace A/C compressor oil at the same time. A/C compressors are designed with a pulley assembly that allows it to engage and disengage with the clutch, and this cycling can cause lots of stress. With this guide, you’ll learn how to safely evacuate the A/C system and add oil to your compressor.
WHAT YOU’LL NEED:
- Air conditioning reclaimer with gauges
- Sockets
- Ratchet
- Wrenches
- A/C compressor oil (NOTE: do not use refrigerant/oil combos, as these will harm your system)
How to Add Oil to Your Auto’s A/C Compressor
Before adding oil, you need to evacuate the A/C system with a recovery machine or reclaimer. Failing to do so will cause refrigerant to be released into the atmosphere, which is illegal in North America. To do this, hook the red valve on the front of the reclaimer to the high side (small diameter) valve on the A/C unit, and hook the blue valve to the low side (large diameter valve). Turn the machine on, open the charging tank and reclaimer valves, and let it run until both gauges read “0”. Turn the valves off and disconnect the lines.
Next, use your sockets and wrenches to remove the electrical connector, drive belts, manifold lines, and finally the compressor. Hold the open end down and rotate the clutch by hand to empty the existing oil. Pour new oil very slowly into the intake port, while slowly rotating the hub and clutch. (You can get the correct oil amount from the A/C sticker on your vehicle or from your vehicle manual). Let the compressor sit for 10 minutes to allow the oil to soak into the front seals, then reinstall the compressor and unit parts.
To restore the refrigerant, reattach the reclaimer hoses, open the valves and run it in “vacuum” mode for 30 minutes. When this is done, run the “charge” mode until all the refrigerant has been pushed back into the system (the reclaimer will indicate when this is done). Remove the reclaimer lines and reinstall the valve caps.
You can read more about replacing your auto’s A/C refrigerant here.
What’s the Best Engine for a Beginner to Rebuild?
Rebuilding an engine can be a rewarding, satisfying experience, especially as you become more skilled. However, it can take a while to learn the ins and outs of engines. Beginners might want to start with a relatively easy project rather than jumping right into complex dual overhead cam monstrosities. Here, we’ve selected engines that are ideal for DIY’ers looking to get their feet wet.
4-Cycle small engines
These inexpensive engines are commonly found in lawn mowers, snow blowers and golf carts. These are basically miniature vehicle engines, meaning that fewer parts, tools, and space are needed to work on them. With replacement parts widely available, they represent a good starting point for a beginner engine rebuild. Some manufacturers also sell rebuild kits with standard replacement parts such as rings, valves, gaskets, pistons and seals to get you started.
Motorcycle and dirt bike engines
These engines are good beginner options for many of the same reasons as a lawn mower or snow blower engine. A classic single-cylinder 2-stroke motorcycle or dirt bike engine makes for the easiest option, though more general maintenance is required. A multi-cylinder 4-stroke engine will be more complex – especially if you choose the overhead camshaft or side valve options – but will also help you graduate to vehicle engines.
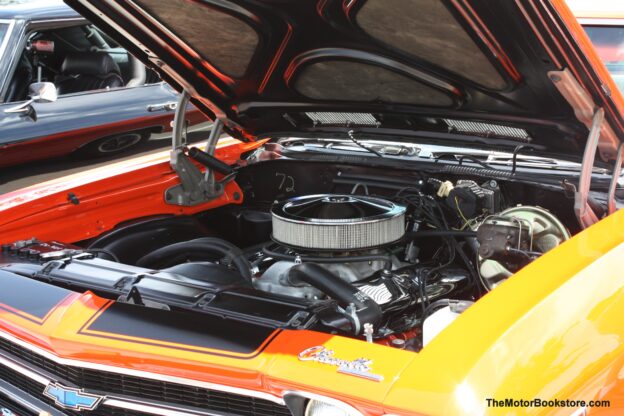
Classic V8 overhead valve engines
Old-school V8 engines, such as the Chevrolet small-block engine and the Ford “Windsor” engine, are considered the easiest beginner engine rebuilds in vehicles. These engines are still manufactured as “crate” engines for auto racing and classic cars, meaning both rebuild candidates and replacement parts can be easily found. Furthermore, the tolerances on these engines are higher than on modern overhead camshaft engines, making them more forgiving for the neophyte rebuilder.
Whatever engine you choose, make sure you do your research and have a good set of instructions to work from. OEM factory manuals such as those offered at The Motor Bookstore are the best option for rebuilds. They offer thorough, specific instructions for your chosen engine. With a little time and patience, you’ll be well on your way to your first successful engine rebuild.
Ready to start that rebuild? Read about some great cost-saving tips to get the most out of your project.
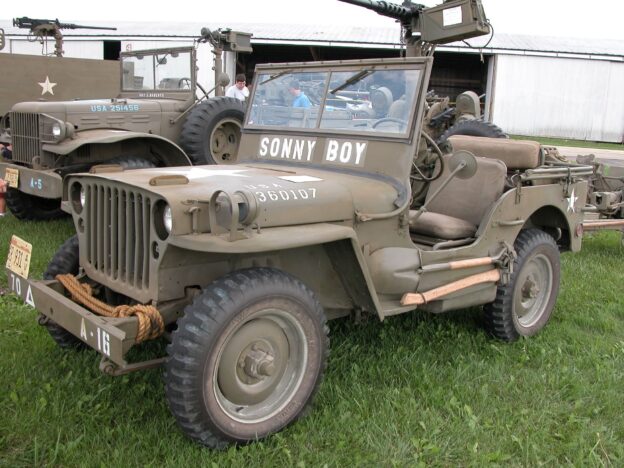
Willys-Overland and Ford produced the iconic 1/4-ton 4×4 military trucks, commonly known as the “Jeep”, during World War II. These versatile vehicles, specifically the Willys MB and Ford GPW models, became symbols of American ingenuity and wartime resilience. Designed for reconnaissance and transportation, these military jeeps were rugged and reliable, making them invaluable on various terrains across the world.
Key Features and Specifications
Willys-Overland and Ford built their military Jeeps to be light, compact, and versatile.
- Weight and Size: Weighing around 2,300 pounds, the Jeep was compact but sturdy, able to carry up to 800 pounds of equipment or personnel.
- Engine: Both Willys and Ford models used the “Go Devil” 4-cylinder engine, known for its durability and ability to generate 60 horsepower.
- 4×4 Capability and Ground Clearance: The Jeep’s four-wheel-drive system and high ground clearance allowed it to handle mud, sand, snow, rocky ground, and other challenging conditions.
- Flat Fenders and Fold-Down Windshield: The Jeep’s flat fenders allowed soldiers to stand on them or place items on them when needed. Soldiers could lower the fold-down windshield to reduce the vehicle’s height, making it less conspicuous and easier to transport.
- Open Body Layout: The open design allowed for quick access to and from the vehicle and accommodated various battlefield roles, from troop transport to cargo hauling.
- Interchangeable Parts: Since Willys and Ford shared the contract to produce these vehicles, they built them to identical specifications, making parts interchangeable. This was crucial for field repairs and logistics during wartime.
Production and Logistics
Production was efficient and designed to meet the military’s needs.
- Total Production: Willys-Overland produced around 363,000 MB models during the war, and Ford produced around 277,000 GPW models.
- Standardization: Willys and Ford standardized components and followed the same technical specifications set by the Army.
- Cost-Cutting Measures: Ford adopted a stamped steel grille, replacing the original slat-style grille. This iconic Jeep feature reduced manufacturing time.
- Mass Production Techniques: Ford leveraged its experience with mass production from its work on civilian vehicles and applied their assembly-line techniques to meet the production rates required of the Willy-Overland and Ford military jeeps.
- Adaptability to Warfront Needs: They made minor design modifications, such as weapon mounts and radios, throughout production based on feedback from soldiers in the field. Some were also fitted with brackets for stretchers to serve as ambulances.
- Support for Allied Forces: The Jeep was not only used by U.S. troops but also supplied to Allied forces through the Lend-Lease program, particularly to Britain and the Soviet Union.
- Transport and Deployment: Jeeps were designed to be transported easily, often shipped overseas in large quantities or, in some cases, air-dropped in pieces for assembly on the ground.
Uses and Operations
The Jeep’s basic and customizable design allowed soldiers to use them in various missions and locations.
- Reconnaissance: With the size and agility of the Jeep, soldiers used them to scout and patrol without drawing too much attention.
- Communications: Soldiers equipped some Jeeps with radios for on-field communication amongst themselves and nearby units.
- Medical Support: The Jeep’s bracket fitment and flat design made room for stretchers and medics for on-field treatment and swift transportation from the battlefield.
- Personnel and Cargo Transport: Due to the Jeep’s payload, it could easily transport soldiers and supplies and tow small trailers to and from the battlefield and outposts.
- Light Combat: Jeeps with gun mounts provided soldiers with a mobile form of combat, allowing them to respond to threats both on the ground and in the air.
- Airborne Missions: Cargo planes air-dropped the Jeeps in pieces for airborne units to assemble upon landing to give the soldiers better mobility.
Legacy and Impact
The success of the 1/4-ton 4×4 truck production effort showcased the U.S. industrial power and established the Jeep as a standard for utility vehicles. The production collaboration between Willys and Ford set a precedent for high-volume, high-speed production that had lasting impacts on military logistics and the automotive industry. The vehicle’s adaptability and reliability helped them fulfill numerous roles during the war, making them indispensable for the U.S. military and allied forces. This versatility and success in different roles laid the foundation for the Jeep’s post-war transition to civilian markets and enduring legacy.
Interested in restoring an old military jeep or classic car? Find out more about car restoration and budgeting in our other blogs! You can also find the Willys-Overland and Ford Military Jeeps repair manual here.
Image credits: 1942 Willys Jeep by D. Miller on Flickr
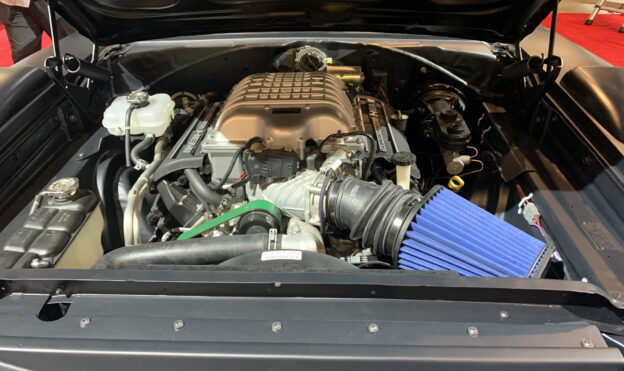
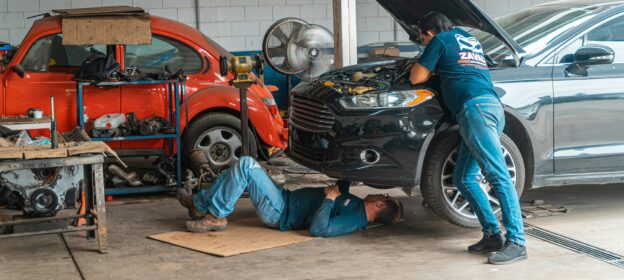
Your car’s engine is its beating heart. It powers everything, keeps your vehicle running, and is arguably the most critical component of any car. Over time, though, wear and tear take a toll on this essential part. This leaves you with a crucial decision: should you repair or replace your engine? Understanding the signs and assessing your options will help you make the right choice for you and your car.
Recognizing Symptoms of Engine Trouble
Before deciding whether to replace or repair your engine, it’s important to identify the symptoms of engine problems. Knowing these warning signs could save the car’s engine and your money. Common symptoms of engine trouble include:
- Unusual noises: A knocking or tapping noise typically points to worn engine bearings, faulty pistons, or other internal problems.
- Excessive exhaust smoke: If you notice black, blue, or white exhaust smoke, this could signal burning oil, incomplete combustion, or a coolant leak in the engine. Each color of smoke points to a different issue that needs to be addressed.
- Loss of performance: If your car struggles to accelerate or drops in power and fuel efficiency, it could indicate internal damage or malfunction.
- Frequent overheating: Constant overheating can signal more serious internal damage, often related to the cooling system.
- Persistent check engine light: If the check engine light stays on after minor fixes, it could indicate a more serious underlying engine issue that requires immediate attention.
Once you’ve recognized these symptoms, the next step is evaluating the extent of the damage. You will need to determine if repairing the engine is worth it, or if replacing the engine is a more financially sound option.
When Should You Repair the Engine?
In many cases, vehicle owners prefer to repair the engine. Repairs tend to be less expensive than engine replacement, and they can often resolve smaller problems. Consider engine repair in the following situations:
- Minor or isolated problems: If your engine issue is limited to one or two components, such as a faulty head gasket or spark plugs, repairing those parts can solve the problem without breaking the bank.
- Lower repair costs relative to car value: A general rule of thumb is if the repair costs are significantly lower than the car’s overall value, it’s worth repairing the engine.
- Relatively new vehicles: Repairing the engine may extend the life and preserve the value of newer cars.
- Maintaining the vehicle’s history: Some car owners prefer to keep the original engine in the car, especially for classic or rare vehicles. In this case, repairing the engine to maintain originality might be a better choice. Check out these repair manuals for DIY engine repairs on classic cars and more.
Though repairing might seem cheaper upfront, it’s essential to weigh the repair costs against the longevity of the fix and the condition of the entire engine.
When to Consider Replacing the Engine
While engine repair is often the first line of defense, there are times when replacing the engine might be the more practical, long-term solution. Consider engine replacement in the following scenarios:
- Catastrophic failure: If the engine has suffered catastrophic damage, such as a cracked block or a broken crankshaft, repairs may not be enough.
- Frequent breakdowns and ongoing repairs: If the engine continues to develop new issues after repairs, the engine may be nearing the end of its lifespan.
- High mileage: Engines with high mileage (above 150,000 – 200,000 miles) are more prone to failures as its components wear out.
- Repair costs exceeding vehicle value: If the cost of repairs exceeds the car’s current market value, a replacement would be more cost-effective.
- Increase vehicle performance: Swapping an older engine for a modern one can enhance power, speed, fuel efficiency, handling, and more.
- Parts are not readily available: Sourcing replacement parts for original engines can be challenging and expensive, especially for older cars.
Repairs are usually less invasive, but a full engine replacement may get you the most out of your car’s value.
Conclusion: Repair or Replace?
Ultimately, the decision to repair or replace your engine comes down to the severity of the problem, the vehicle’s age, and your budget. If repairs are relatively minor and the car has a lot of life left in it, repairing the engine could be a cost-effective way to keep it running. However, if the engine has suffered major damage or the car is old with high mileage, replacing the engine might be the smarter choice in the long run.
Ready to start your repairs? Read more about budgeting for repairing your engine and tips for a rebuild.

Transmissions are one of the most essential parts in your vehicle, acting as the middleman between the engine and the driveshaft. They also suffer more wear and tear than other parts, and failures can be expensive to repair. With this guide, you’ll learn about common automatic transmission problems so you can diagnose them early.
Problems going into gear
Once you shift into drive, your transmission should immediately go into the appropriate gears. But a balky transmission will sometimes hesitate, go into the wrong gear, or just not go into gear at all. As it gets worse, the transitions between gears become more jarring. Potential causes include problems with the gears, an open electrical circuit, failed shift solenoids, or broken valves.
Slipping gears
Another sign of trouble is your car slipping out of gear while driving. You can tell this is happening if the RPMs rev higher than normal without an increase in speed. This could be caused by worn or broken gear linkage, a worn clutch, or faulty solenoids. If the transmission only slips when it’s warm, it may mean the internal seals or valves are broken.
Low/leaking fluid
Automatic transmission fluid (ATF) is your transmission’s lifeblood, and low or leaking fluid is a common cause of failure. The resulting increases in friction, corrosion and sludge build-up can lead to the whole unit breaking down. Check your fluid at least twice a year – ATF doesn’t burn off, so if it’s low, you can be pretty sure you have a leak somewhere.
Overfull fluid
Conversely, putting too much ATF in your vehicle will also cause problems. Excessive fluid can cause foaming, which leads to shifting problems and slipping. The increased pressure can also damage internal seals and cause leaks. Fluid that is dark or smells burnt is also a sign of trouble.
What should I do?
If you suspect a transmission problem, get to a repair shop as soon as possible. Waiting until you “have the time” or “have the money” increases the chances you’ll need more of each to get it fixed. Make sure your fluid is filled adequately and is a bright red color. You’d also be surprised how many problems you can fix by replacing the filter, as clogging leads to other disasters.
Something else going bad? Check out our blogs on what to look for in a battery or alternator and fuel pump.
With Christmas comes Christmas movies, both new and old. Some feature iconic landmarks, some feature traditional characters, and some feature memorable, classic cars. Read on to learn about some of the most famous Christmas movies and their classic cars.
It’s a Wonderful Life (1946)
In It’s a Wonderful Life, one of the most important things to George Bailey is his 1919 Dodge Brothers Model 30. This early Dodge car was the first to be produced in Detroit and had multiple different body types, such as the sedan and roadster, available. Despite the harsh New York winters, however, George Bailey opted for the convertible touring model.
A Christmas Story (1983)
This 1937 Oldsmobile Six F-37 was Ralphie’s father’s treasure in A Christmas Story and a rather popular sedan at the time. Despite how much he loved the car, he had some frustration with the level of maintenance it required. Ralphie tried to help his father with the car one day, leading to the iconic soap-in-mouth moment.
Miracle on 34th Street (1947)
In Miracle on 34th Street, a conversation with Kris Kringle leads Fred Gailey and Doris and Susan Walker to drive by their dream house in Fred’s 1940 Ford V8 Standard Coupe. Though the car doesn’t play a significant role in the film, it records the use of the Standard model that is rather rare today compared to its Deluxe counterpart.
Scrooged (1988)
The Checkered Cabs were rather short lived, but very important to the New York-based films made in the early 1960s and on. In Scrooged, the Ghost of Christmas Past drives one to take Frank Cross through time to reflect on his childhood.
Home Alone (1990)
Harry and Marv used their “OH-KAY Plumbing & Heating” 1986 Dodge Ram Van as a cover to access wealthy neighborhoods in Home Alone. The spacious interior proved useful as the “Wet Bandits” used it to store their stolen items.
Want to read about more famous cars? Check out our blog about celebrities’ classic cars here.
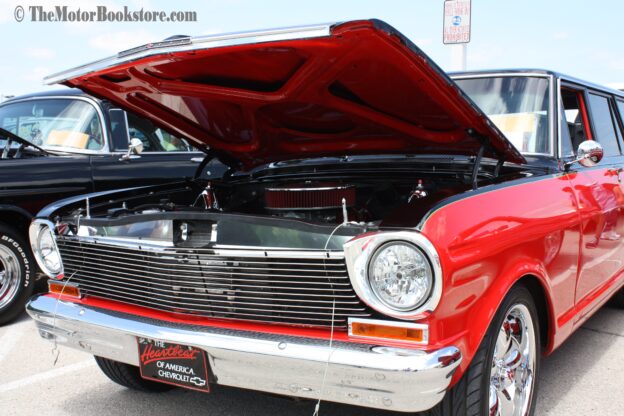
You’ve finally completed your first car restoration and are ready to show it off, but what do you need to do to make your first car show go smoothly? The Motor Bookstore is here to help make prepping for your first car show go smoothly so everyone can see your handiwork at its best.
Cleaning the Exterior
Everyone will see your car’s body first, so be sure to make a good impression. Begin by cleaning the engine and undercarriage with a good degreaser. Next, do tires and wheels using a commercial cleaner spray and scrub brush. Finally, hose the car down and clean it with an automotive cleaner and sponge, working your way from the roof down. Rinse the car and dry with a microfiber towel.
Waxing
A good waxing will really make your car shine. Apply wax in thin coats, working in small sections around the car. Make sure to do this in the shade or other cool environments – if the paint gets hot, the wax will dry too quickly and cause hazing.
Interior
People will be peeking inside your car at the show, and you want them to like what they see. Scrub the door jams and hinges, then vacuum and clean the carpet with carpet cleaner. Wipe down vinyl and plastic upholstery with warm water and mild soap. Clean the glass using an automotive glass cleaner (household glass cleaners will cause streaking).
Detailing
Your new NGK spark plugs and satellite radio may be great for modern driving, but car show visitors and judges will be less impressed. Have as many factory original parts as possible – filters, wheels, plugs, radios, etc. You should also make sure your tires don’t have abnormal wear. If you plan on being a show regular, it might be worth investing in a display-only set of tires and wheels.
At the Show
Make sure to bring some cleaning supplies and touch-up tools for standing dust and dirt, especially if it’s an outdoor show. A car cover to protect it at night is also a good idea. You can draw additional interest by putting together a display with original sales brochures, owner and shop manuals, and maybe a photo album of the restoration process.
Working on a restoration for a car show? Check out our blogs on restoration budgeting and prep for handy DIY restoration tips.
Buying a used car can be a great way to save money and still get a reliable vehicle, but it’s important to inspect it thoroughly before making a purchase. By taking the time to look over the car carefully, you can avoid potential problems and make sure you’re getting a good deal. Read on to learn more about how to inspect a used car before buying.
What to Bring
Some basic supplies will help you during the inspection process. Bring a notebook and pen to take notes and a small flashlight for the engine compartment. A magnet will help you detect concealed body work, and a CD or auxiliary cord is good for testing the sound system. Also, bring paper towels for checking fluids and a code reader for the onboard computer.
Check the Exterior
The first step in inspecting a used car is to check the exterior for any damage or signs of wear and tear. Look for scratches, dents, and rust, as these can all be indicators of larger problems. Check if there’s any sagging, which could show signs of suspension or frame problems. Make sure the body panels are all aligned properly and that the paint color matches across the entire car. Don’t forget to check the tires as well – uneven wear could mean steering, suspension, or frame damage.
Look Under the Hood
Inspect the engine compartment for any signs of leaks, including oil, coolant, or transmission fluid. Check the battery to make sure it’s in good condition and that the terminals are clean. Inspect the belts and hoses for any signs of wear, cracking, or corrosion. Look for oil stains on the block or foam residue on the oil filler cap, both of which can signal a leaking head gasket. Don’t forget to check the air filter and the condition of the radiator.
Inspect the Interior
Once you’ve checked the exterior, it’s time to take a look inside. Start by checking the seats and upholstery for rips, tears, and stains. Also, look for signs of damage on the dashboard and door panels. Make sure the air conditioning and heating are functioning and that there are no strange odors coming from the car. Check if the lights and other electronics are working properly. Use your code reader to see if any computer error messages come up and what they mean.
Test Drive the Car
With any car, you should always try before you buy. Check again for leaks by letting the car run while parked for 30 seconds, then moving it and seeing if any fluids have been left on the ground. Pick a route with some turns and speed changes. Listen for any unusual noises or vibrations and pay attention to how the car handles in turns and at higher speeds. Also, give the brakes a hard press at speed to see if there’s any pulsating or swerving.
Check the Vehicle History Report
Finally, it’s a good idea to check the vehicle history report before making a purchase. This will give you a detailed record of the car’s past, including any accidents or repairs that it may have undergone. It can also tell you whether the car has been stolen or has a salvage title, which can affect its value and insurance rates. You can usually obtain a vehicle history report from a third-party provider like Carfax or AutoCheck.
By following these steps, you can ensure that you’re making an informed decision when purchasing a used car. Taking the time to inspect it thoroughly can help you avoid potential problems and ensure that you’re getting a good deal. With these tips in mind, you’ll be able to confidently shop for a used car and drive away with a reliable vehicle.
Looking for more information on how to inspect a used car? Check out these blogs about fuel pumps and batteries and alternators to learn more.
Car restoration isn’t just for everyday folks. A love of cars is something that stays with you for life – if you end up becoming a famous celebrity, you can take that love to even greater heights. Read on to learn about some of the celebrities who like to restore classic cars as much as any other enthusiast.
Jay Leno
The former “Tonight Show” host is the standard-bearer for the celebrity classic car community. Leno’s collection consists of nearly 300 restored automobiles and motorcycles. It has everything from Doble steam cars to a 1960 Panhard PL 7. He’s also known for his car knowledge, which has led to the TV show “Jay Leno’s Garage” and a regular column in “Popular Mechanics”.
Tim Allen
Known for his role as Tim “the tool man” in “Home Improvement,” Tim Allen has collected a wide variety of both domestic and foreign classic cars over the years. His collection consists mostly of Chevrolets, such as the 1968 Chevy Camaro 427 COPO and the 1962 Chevrolet 409 Bel Air. He also collects several Fords, like the rare 1986 Ford RS200 only sold in the UK. His 1956 Ford F100 was featured in his latest show, “The Last Man Standing.”
Patrick Dempsey
The former “Grey’s Anatomy” star keeps a rotating collection of restored vehicles, which at times has included a 1954 Jaguar XK120, a Porsche 911 GT3 RS, and a 1967 VW Beetle. He even still owns and drives his first car, a 1963 Porsche 356. Dempsey’s love of vehicles led him to become a professional endurance racer in his own right.
Magnus Walker
This British former fashion designer has a great love for vintage Porsche 911s. He has about fifty Porsches total – forty of those being various 911s. He fell in love with the Prosche 911 as a kid and has since purchased and personally modified several 911s solely for the joy of driving them on the open roads.
Jeff Beck
The 8-time Grammy-winning English guitarist is fascinated with American hot rods, especially Ford Deuce Coupes and Roadsters. And unlike many celebrities, he does much of the restoration work himself – and has even built a 1932 Ford Coupe from scratch. At last report, his collection includes 14 hot rods along with several Chevrolet Corvettes.
Jerry Seinfeld
The comedian is known for his love of classic cars and various restored vehicles have been seen in his web series “Comedians in Cars Getting Coffee”. Seinfeld carefully guards his personal life, so we can only guess at the full extent of his collection. But in March 2016, he sold 17 cars, including 15 Porsches, at auction for a total of $22.2 million.
Adam Carolla
The podcast magnate and filmmaker has a collection of more than 20 classic cars, including several Lamborghinis, two former Paul Newman race cars, a Ferrari 330 GT 2+2, an Aston Martin DB9 and a Jaguar XJ-R. He hosted “The Car Show” when it aired on Speed TV, and competes in vintage car races throughout the country.
Wayne Carini
The TV personality started hosting his show “Chassing Classic Cars” in 2008. On the show, he searches throughtout the states for the rarest and neatest classic cars to buy and restore. While he makes a business out of selling the cars he restores, he keeps a private collection of unrestored cars, such as his favorite 1950s Hudson Italia. He also has a particular fascination for Ferraris ever since he first rode in a 1960 Rosso Chiaro 250 SWB.
Interested in car restoration? Read our blog on car restoration and check out our selection of restoration literature to get started on your project.


Search Our Blog